A lot of us are now working remotely, and connectivity plays a key role in that. Being connected to the internet is just another thing in our lives that does not take a lot of thought process as long as we stay connected. However, what are the steps you need to take if your taskbar shows WiFi Connected but No Internet Access on your computer?
This guide will tell you everything you can do to fix your internet connection and breathe life into your devices again!
Also read: Fix Windows 10 Shutdown, Sleep & Hibernate Problem Easily
Reasons Why Your Internet is Not Working
Before taking any step further, we should first discuss the reasons behind the connection failure. If you are on a Windows PC, you might see a prompt besides your WiFi menu saying “Connected, No Internet Access” or a similar message on other devices. Some of the common reasons for this are –
- The WiFi router is not working as intended.
- Internet Service Provider (ISP) is facing an outage.
- Antivirus software or Firewall is interfering with the internet connection.
- DNS Server is not properly configured, or the cache might be corrupted.
- The device’s wireless modes are outdated.
The first thing you can do to determine whether it is your device or your router’s problem is to check if the internet is working on other devices or not. If all your other devices show a similar “Connected, No Internet” prompt, then it is surely your router’s or ISP’s problem, which we will cover in the latter part of the article. If not, you need to follow these further steps.
Fix WiFi Connected But No Internet on your Windows Device
1. Restarting your Devices
We understand that you already might have tried this step before finding this post, but if you haven’t already, you should definitely restart both your WiFi modem and your computer. This ensures that the network devices refresh their IP tables and reload their configuration files. After turning off your devices, you should wait for 30 seconds and then turn them on again.
2. Using the Windows Network Troubleshooter
Windows has got a nifty feature that lets you troubleshoot your connection problems. The Windows Network Troubleshooter runs a diagnostic test and looks for prominent issues that might be causing the network failure problem.

To use the Windows Network Troubleshooter,
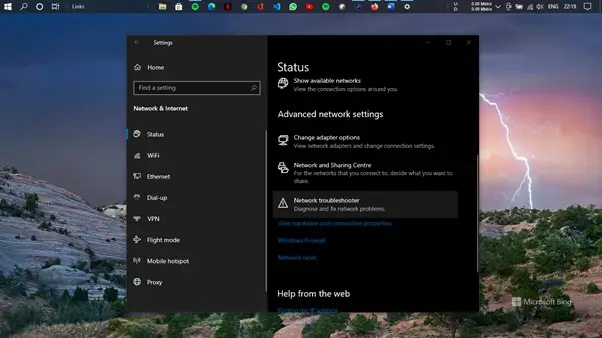
- Go to Settings by pressing the Windows Button and clicking/tapping on the Settings icon on top of the Power icon.
- Now click on the “Network & Internet” option.
- After opening that, you can see that your internet is connected but not working in the Status tab. Scroll down a bit and click on “Network Troubleshooter” which will diagnose and fix network problems.
Run the test and check if your internet connection is back online. If not, follow the succeeding step.
3. Updating Hardware Drivers
The next thing to do is to update your hardware drivers. Windows 10 updates might occur on the go, but firmware updates still need to be done manually. If you are using an old PC and the drivers have not been updated in a long time, this might be why you cannot connect to the internet.
To update your WiFi drivers,
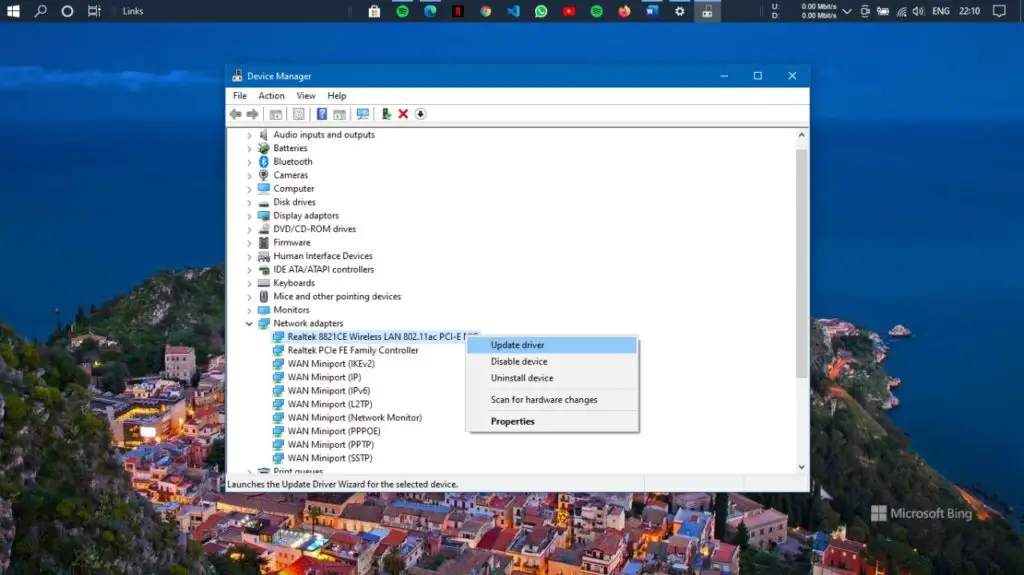
- Press the Windows button and type “Device Manager” and open it.
- Find the option “Network Adapters” and click on the arrow to expand it.
- Here, you will see all the adapters that your PC has for the internet and other networks. Find the “Wireless” one and right-click on it.
- You will now see an option to “Update Driver” in the pop-up menu. Click to update.
- If your computer fails to update the driver, you might need to manually install the right one from your motherboard manufacturer’s website.

Follow the next step if your internet is still not working.
4. Flushing the Domain Name System (DNS)
The Domain Name System (DNS) is essentially a system that translates domain names (www.example.com) into IP addresses (x.x.x.x). However, if the DNS cache gets corrupted, it can cause a mismatch in your IP address. This prevents your device from connecting to the internet.
To flush your DNS records,
- Press the Windows button and type “Command Prompt”.
- Run it as Administrator.
- Now type in the following and hit Enter after each one.
ipconfig /flushdns
ipconfig /release
ipconfig /renew
Once you have done this, you can close the command prompt window and check whether your internet connection is back or not.
5. Checking Validity of IP Address and Changing DNS Server Address
The IP address could sometimes be invalid that could also cause your network not to function properly. To check the validity,
Open Command Prompt with admin privileges and type in the following command:
ping 192.168.1.1
Note: Here we are assuming that your router/modem IP is 192.168.1.1, if it is not then enter the IP you enter to access the router/modem settings.
If the command prompt shows a timeout response or destination source unreachable, you should set your network settings so that it automatically obtains your IP address and DNS settings from your router. To do so,

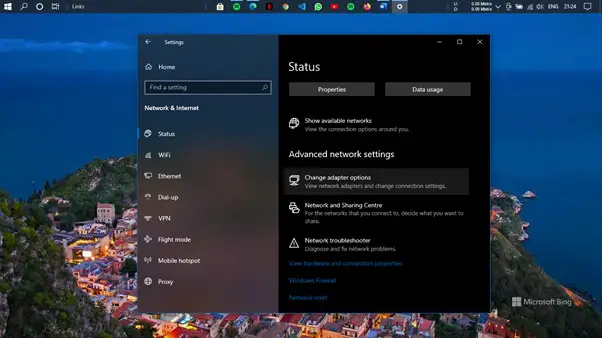
- Go to Settings by pressing the Windows Button and clicking/tapping on the Settings icon on top of the Power icon.
- Now click on Network and Internet.
- In the Status section, click on “Change adapter options” under “Advanced network settings”.
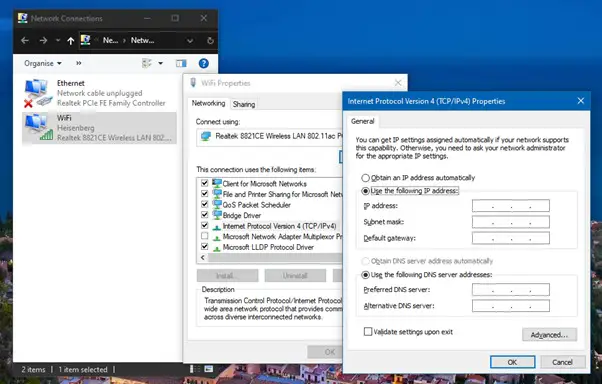
- Now right-click on WiFi and select Properties. A new window will open.
- Select “Internet Protocol Version 4 (TCP/IPv4) and click on the “Properties” button below. This will open another window that will display how your computer is obtaining your IP address and DNS server. Ensure that both the IP address and DNS server address are being obtained automatically and click on “OK”.
- If the internet connection is still now back, you can manually set the Preferred DNS server to “8.8.8.8” and Alternate DNS server to “8.8.4.4” and click on “OK”.
- Test your internet connection again to check whether the issue is resolved.

6. Disabling Antivirus Software
At times, there could be conflicting software that could interfere with your internet connection, such as Antivirus. Try disabling your antivirus software, if any, and connecting again to see if the problem is resolved.
Also read: How to Fix Windows 10 Taskbar Problem
WiFi Connected but No Internet on All Devices
1. Checking Whether Your Internet Service Provider has an Issue
If the WiFi is connected across all your devices and still there is no internet connection, there might be a problem with your Internet Service Provider (ISP). You can check whether your ISP is functioning properly or not by contacting them or raising a support ticket on their website. Alternatively, you can also check on your ISP’s social media page or other websites like DownDetector to see if others are facing the same issue as well.
2. Resetting your Modem/Router
Warning: Only proceed with this step if you are sure that you can reconfigure the Modem/Router, otherwise we highly recommend you to contact your Service Provider and register a complaint.
Since you already rebooted your wireless router in the first step, perhaps you should try resetting it now. Resetting your modem will return it to how it was out-of-the-box or factory settings. This step will also erase customized settings such as static IP address, DNS settings, passwords, port forwarding, routing, and DHCP settings.
To reset your router, press the RESET button, which is usually on the back and in red color. For some routers, you might want a paper clip or pen tip to do that.
- Press the RESET button using either a paper clip or pen tip for 15 seconds. You should feel/hear a click when you do so. The lights on the modem should start blinking after this.
- Wait for 5-10 minutes so that your router stabilizes.
- You will now need to run the modem activation process again just like you did for the first time. Enter your login details if prompted to do so.
- Wait for the light to turn green and connect your devices with the router again.
Final Words
It causes a great inconvenience when we are not online. All the above steps will fix major problems that might occur either with your device or your router. We hope we have resolved your issue and you have connected to the digital world again! If you are still not able to access the internet using your WiFi router, you might want to call a technician for further assistance.
Also read: Fix VPN Not Working on Windows 10
