Today, the internet is driven by videos. Everyone has got ample of data and streaming videos is the new cool to feed knowledge, information and entertainment. This is why video and content creators are rising these days. But to edit videos, we need to have good hardware and software.
These days, Mobile Phones have excellent video shooting hardware and with just your mobile phones, you can capture some really awesome content. But on the software side of things, most people opt for freeware which gives you limited abilities and tools to edit your videos. And professional editing tools are too complicated if you are a beginner, or you want to make simple videos.
VideoProc is a multi-functional video utility software which boasts a lot of tools for 4k video editing. It’s fast and lightweight, which usually isn’t the case with most of the other video editing software. VideoProc’s main expertise is processing videos which are of high quality and length. It also uses GPU hardware acceleration which takes the advantage of your GPU to its full potential.
If you’re just into 4K video editing, professional applications like Final Cut Pro X and Adobe Premiere Pro may seem a little complicated and confusing to you. VideoProc is aimed for consumers looking for a lightweight but advanced video editor. Its features include editing, trimming, merging, and enhancing videos.
Let us take a deep look into what VideoProc offers –
Features
Here are some basic 4K video editing features that VideoProc offers–
- Cut: Using flexible cut, users can shorten a 4K video, chop away any unwanted segments, rearrange clips in a new sequence and optimize size for YouTube, etc.
- Merge: Sometimes, we capture videos through different cameras or they might be in different formats like MP4, MKV, AVI, MOV. Using the Merge option, you can merge these different videos to create your masterpiece. You can also adjust the video length, playback speed, resolution, and file extension, without worrying about A/V sync problem. There is also a unique “MKV Multi-Track” feature which allows you to combine different video/audio/subtitle tracks in one MKV file.
- Crop: This feature is pretty self-explanatory. The Crop options lets you crop your videos so that you can remove distracting portions, zoom in and highlight the focal point and improve the image composition. You can also use the crop to define your aspect ratio for YouTube, Instagram, etc.
- Subtitle: These days, subtitles are super important. Because videos are watched globally and in different languages. Using the Subtitle feature, you can enable, disable or export subtitle from a movie, choose subtitle (language) track, add (hardcode or softcode) external subtitle files (.ssa, .srt) to videos, search subtitles online for movies and TV episodes, etc.
- Effects: The Effects option lets you add various effects to your videos like Grayscale, Mirror, Edge, Painting and Sharpen to your video tracks. You can use Quick molds to artify and stylize your videos. There are also options to fine-tune colors, image brightness, contrast, hue, gamma, and saturation.
- Miscellaneous Features: VideoProc boasts a lot of feature such as video stabilization, fisheye fixing, noise removal, GIF maker, video enhancements, MKV, and M3U8 encoding, etc.
Getting Started with VideoProc
Getting started with VideoProc is very easy. VideoProc welcomes you with a very clean and intuitive UI. It has got multiple options to edit (4K) videos.
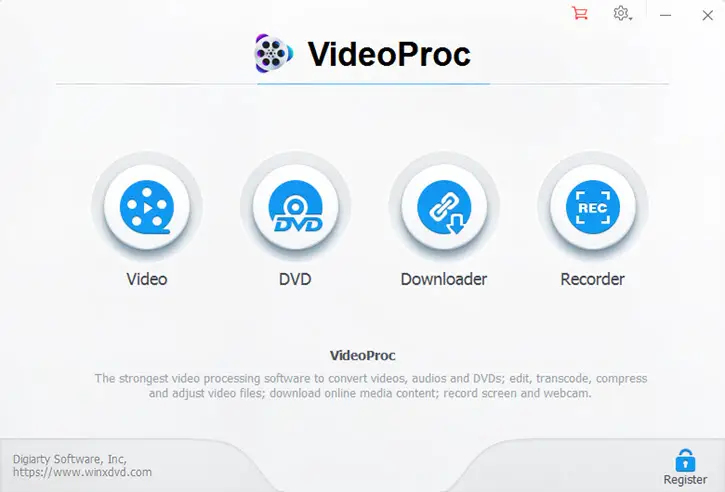
The first step you would want to do is enable hardware acceleration. You can do this by clicking on Settings > Options > Hardware Acceleration. To start working on a new video, you can click on +Video button so that you can import videos. You can import a single video file or multiple of them.
Adding Effects
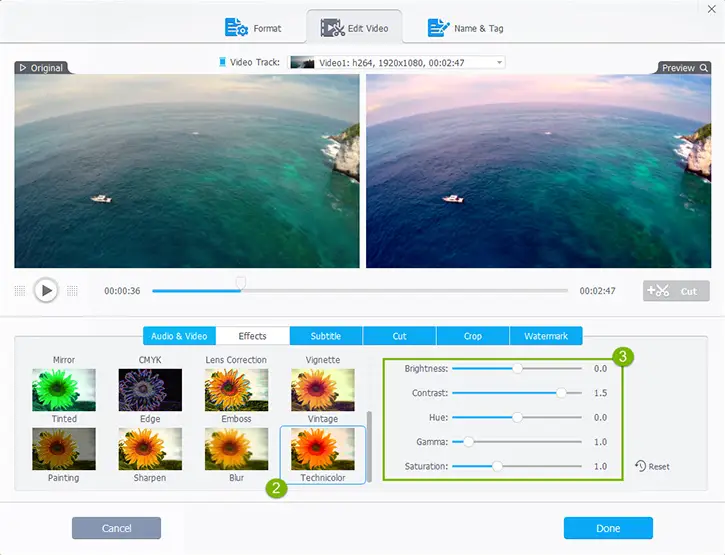
To add Effects to your video, click “Effect” function button labeled in magic wand icon to pop up the video effects controls.

Preview and choose the video filter effect you like most. After choosing the effects, you can adjust video brightness, contrast, hue, gamma, saturation to achieve a more satisfying visual effect.
Stabilizing Videos
If you have shaky footage, you can use this feature to stabilize your video. To do so, click the “Toolbox” tab on the bottom of the interface and select “Deshake“. Double-click Deshake button or click gear icon on the top right corner of this button to access to video stabilization controls.
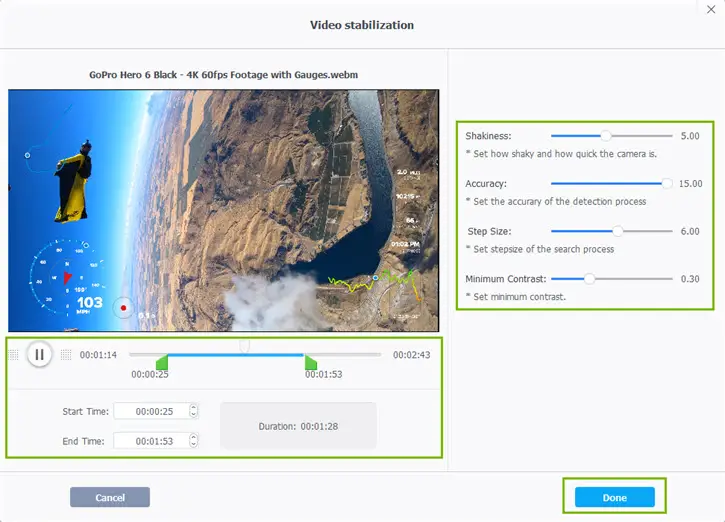
Now, move the two green cursors to trim out the shaky part of your video. You can also manually input Start and End Time.
Using the sliders, adjust Shakiness, Accuracy, Step Size and Minimum Contrast for stabilizing the cut segment and click on Done once finished.
Convert Videos
Start by importing videos by clicking on +Video to import one video or multiple videos (for batch transcoding) into the program.
Now, click the “Video” tab on the bottom of the interface. You can select from the popular video formats which are presented. Select the desired one as output format.

You can also click on Target Profiles to view more formats –
- “General Profiles”: Transcode video to H.264, MPEG4, MOV, HEVC, WebM and more.
- “Music”: Convert video to audio file in MP3, M4A, WAV, FLAC, AAC, iPhone Ringtone, etc.
- “Mobile Video Profile”: Transfer video to Apple, Huawei, Samsung, Android, Microsoft Device and Sony Device.
- “Web Video Profile”: Make the video compatible with YouTube, Facebook, Vimeo, and other online video-sharing sites.
- “DVD Profile”: Change the format to NTSC/PAL VOB for later DVD burning.
- “HD Video”: Turn the video to TS, AVCHD, MKV, and MPEG HD.
- “Quality”: Move the pointer to High Quality for higher image quality or Fast for the fastest transcoding speed.
- “Video Codec Options”: Modify frame rate, resolution, aspect ratio, etc. for obtaining better playback effects.
- “Audio Codec Options”: Audio channel, sample rate, and bit rate can be fine-tuned for outputting Hi-fi audio.
Downloading Music and Videos
Using VideoProc, you can also download music and videos.
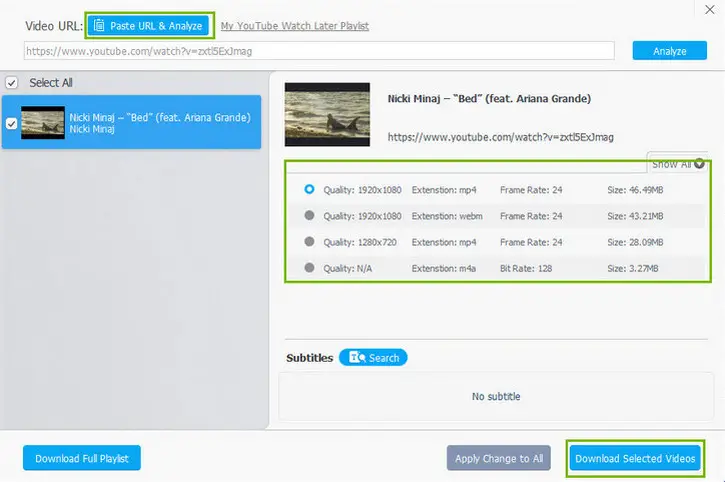
- Click on Downloader to open the Downloader Panel.
- Now copy the URL of any music or video and click “Add Video” or “Add Music”, and then hit “Paste URL & Analyze” to insert the URL you just copied. The video link will be analyzed instantly.
- Select the desired output quality and format, and click “Download Selected Videos”. Then click on ‘Download Full Playlist” button when all videos are what you want.
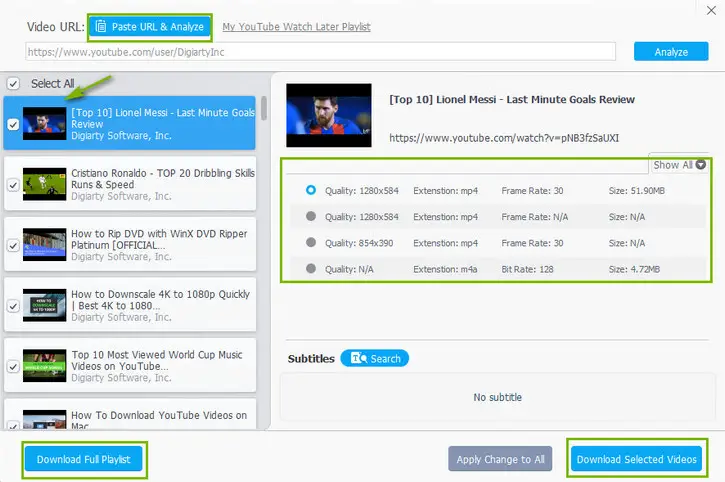
- Click on the “Browse” button to set output folder, and “Download now” to get playlist/channel videos to download started.
DVD Conversion
Using the DVD option, you can use the footage on present on your old DVDs and use it in your current project. Open VideoProc, and select the “DVD” option. Now click on “DVD Disc” button and a window will pop up asking you to select source DVD discs. After selecting the source disc, click “Done”.
You can do the following actions on your DVD
- General Profiles: Convert DVD disc to H.264, MPEG4, MOV, iPhone, Android, HEVC, WebM and other mainstream video formats.
- DVD Backup: Copy main movie content, full title to MPEG2 or MKV or clone DVD to ISO image, VIDEO_TS folder at 1:1 ratio.
- Mobile Video Profile: Convert DVD to Apple, Huawei, Samsung, Android, Microsoft and Sony Device.
- Web Video Profile: Convert DVD to YouTube, Facebook, Vimeo or other online video-sharing sites.
- Music: Extract soundtracks from DVD as MP3, AAC, AC3, FLAC, etc.
Record
- VideoProc also has a built-in recorder which lets you record desktop screen activities, record video with Webcam, and also record screen and webcam at the same time.
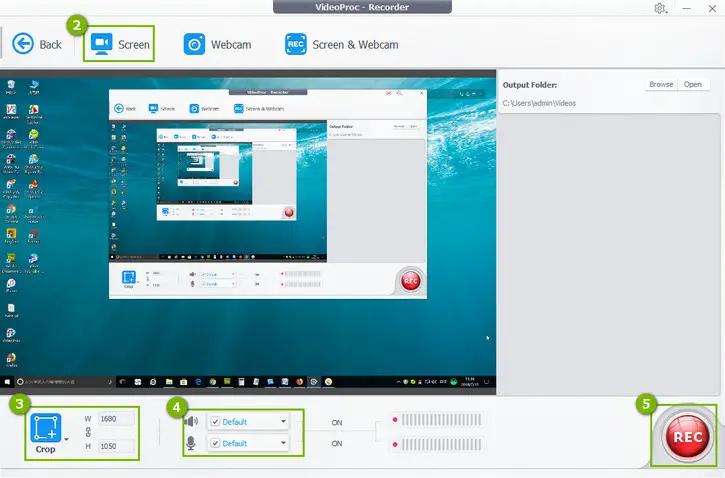
- To edit the settings and presets, click the gear icon at the top right corner and choose “Settings”. In the Settings panel, you can reset shortcuts, specify recording quality, recording format, and whether you want to show mouse, mouse clicks, key, and countdown in the screen, and more.
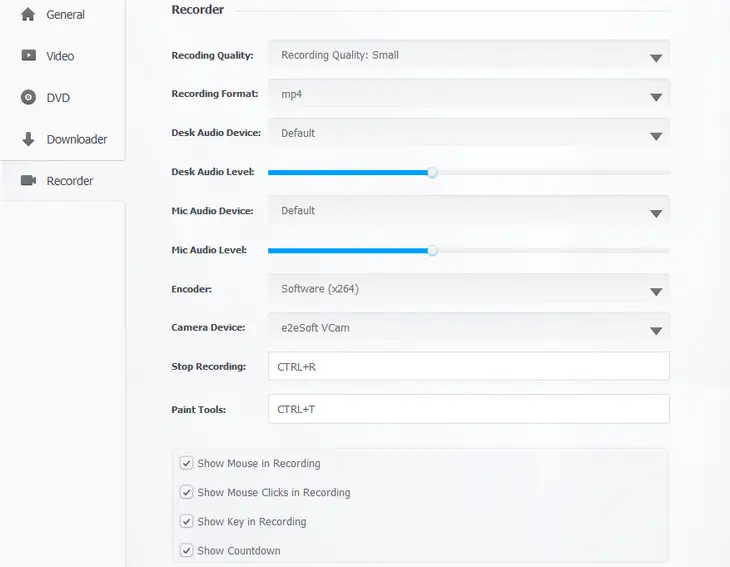
- You can now exit the Settings window, and then click the “Screen” button to load your computer screen.
- Click “Crop” button at the bottom left corner to markup the area you want to record. To record the entire screen, you don’t need to click on”Crop”.
- System sound and microphone are turned on by default. You can enable or disable certain sounds based on your needs.
- To start recording, “REC” button at the lower right corner, then it will begin recording screen within 5 seconds.
Support
VideoProc is supported on both Windows and Mac. Here are some details about it –
- Platform: macOS 10.6 or later | Windows 7 or later
- Installation size: 47.0MB
- Disk space: 200MB
- Processor:1 GHz Intel® or AMD® processor (Minimum)
- RAM:1GB RAM (Recommended: 2GB or above)
Supported GPUs for Hardware Acceleration Tech:
- NVIDIA: NVIDIA® GeForce GT 630 or higher
- Intel: Intel® HD Graphics 2000 or higher
- AMD: AMD® Radeon HD 7700 series (HD 7790 (VCE 2.0)) or higher
Pricing
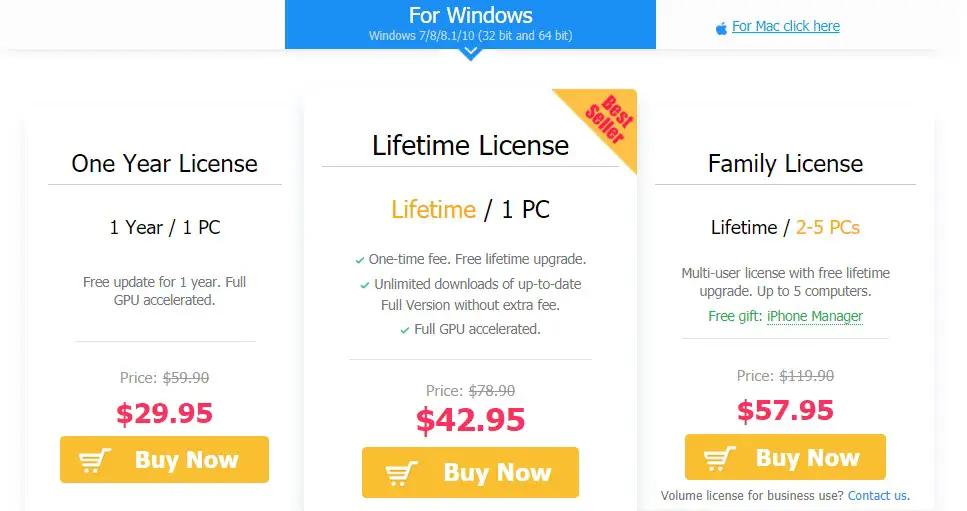
VideoProc is available as three licenses –
- One Time –
$59.90$29.95 - Lifetime License with lifetime update support –
$78.90$42.95 - Family License with Lifetime Support for 2-5 PCs –
$119.90$57.95
You can also participate in VideoProc’s Giveaway of a free licensed copy by clicking here.
Our Verdict
VideoProc is perhaps the best lightweight video editing software we have come across. It’s GPU Hardware acceleration might be one of the most unnoticed features, but it definitely ramps up the video processing speeds. Adding effects, merging, cutting and cropping videos all are done within minutes which makes it a go-to software for content creators.
It excels in processing GoPro and other 4K footage. It handles large-sized videos without any hassle. And you can also edit high-speed videos shot with 120fps/240fps and slow-mo videos with ease.
Other nifty features like video downloader, DVD and screen recorder adds up the icing on the cake!
