Over the years, mobile application technology has grown beyond the imagination, all credit goes to the growing number of mobile internet users. According to a study conducted by Statista, global mobile data traffic is predicted to grow about sevenfold between the year 2016-2021.
No wonder, today, mobile users need mobile-friendly websites coded for smooth interaction on digital devices like tablets and smartphones. Luckily, there are numerous mobile website builders out there that have excellent mobile editors offering you mobile building experience straight from your mobile devices.
This post talks about some of the popular website maker applications that offer you capabilities to improve the user experience of your site to mobile users. Moreover, these applications allow you to make basic changes and edits without going to your computer.
These website making software solutions are going to be advantageous for those businesses that can’t enjoy the luxury of retreating to their workspace for making small changes in their websites.
This post includes mobile website builders that focus on the Android platform specifically. It is worth mentioning here that Android dominates the mobile OS market worldwide with 74.45 percent share. So, it is important that you choose a website builder that gives adequate technologies to make your site compatible with Android devices.
Best Website Builder Apps for Android
1. Weebly

Weebly is one of the popular website builders available that has a feature-rich mobile editor. Launched in the year 2006, it has over more than 50 millions customers across the world. Weebly was founded by David Rusenko and his co-partners Dan Veltri and Chris Fanini.
According to Datanyze, Weebly has a market share of 12.39%, contesting with Squarespace and Wix.
The website builder seems a good option for the businesses looking for editing access 24/7. Their free Android editor is a new addition that allows users to drag and drop elements into the mobile editor directly.
Moreover, users can choose from several templates and color schemes and enhance the user experience of their sites. Talking about the ease of use, everything is so uncluttered that even a newbie can understand it without any hassle.
Advantages of Weebly Builder Application
- User-friendly interface
- Pre-designed layouts
- Full commerce option
- Option for customizing mobile sites
- Auto-saves website edits
- iPad site-editing application
The good thing is that their mobile editing app is available for the following platforms as well (along with Android device)
- iPhone
- iPad
- Apple Watch
2. Wix

Wix.com Ltd. or simply Wix is an Israel based web development platform that helps users create HTML5 websites and mobile sites. The company was founded in 2006 by Israeli developers Avishai Abrahami, Giora Kaplan and Nadav Abrahami.
In the past few years, Wix has grown into an ideal option for Android application developers. The reason is, this mobile website builder provides a mobile-optimized version of the theme/template being used. You do not need to optimize the website for mobile separately. You can easily edit the mobile version of your site and make changes in the background and colors.
Unlike most website builders, it doesn’t just compress a website to make it acceptable on mobile devices.
In addition to this, Wix allows users to transfer content directly to the mobile version. You also get an option to hide specific content. In short, you’re in full charge of what to display and what not on your mobile site. Perhaps, this is the reason Wix is counted among the best mobile website building applications.
What makes Wix distinct from the competitors is, they understand how much important the time is for the users. Today, internet users don’t want to browse through the entire website searching for the right information. Wix is rescuer here. It helps you provide the required information in the most efficient way.
Their another feature that please most users is that users are allowed to add a tap-to-call option on their websites. This way, your visitors will be able to tap the number that will automatically connect them to you.
The Wix mobile editor is designed in a way, it automatically detects whether a user is logging in from a desktop computer or a smartphone. It helps Wix to redirect a visitor to the Android compatible version of your website.
3. Impress.ly
Relatively, Impress.ly is a new name in the website builder industry. It was launched in the year 2015 and is a joint venture between AppMachine and Endurance International Group.
It is designed keeping the requirements of mobile sites in mind. So, it is not surprising at all the company provides a mobile editing application which is available for Android and iOS devices.
Though this mobile editing application is popular for automated website generation yet you have plenty of options to edit a website according to your needs.
Speaking of pricing, their starter plan starts at $9/per month (Billed annually). You get the following services and features with this plan.
- Free custom domain for the 1st year.
- Basic analytics
- Desktop, smartphone, and tablet-optimized sites
- Social feeds plus basic information
- According to your needs, you can upgrade to their premium plans anytime. Their business plan costs $14 for a month.
Advantages of Impress.ly
- User-friendly
- Mobile friendly
- Easy pricing model
- Free trial available until you publish your site
4. Jimdo

Jimdo is another mobile website builder getting a lot of recognition across the globe. Came into existence in 2007, it serves over 20 million websites. Although it is not as cutting edge as some of its competitors, still it is a good choice for those who want to get a site up and running without using any coding skills.
All the design templates available on the Jimdo are mobile-responsive. It means with small edits you can make your site look great on smartphones.
In the beginning, they had a separate mobile editor, but since they have streamlined their approach, they are coming with more exclusive templates that make your site appear more friendly on mobile devices.
The good news is even after the addition of new features, the platform does not indicate a high level of complexity.
Jimdo has a visual tool for navigating structure changes. Not only this tool saves a lot of time but also makes it easy to edit different parts of website content.
This website building tool comes with great search engine optimization capabilities as well. Their backend provides more control over the elements like page title, SSL-encryption, meta description, etc. It helps a website to have a good ranking in search engine results.
Jimdo mobile website builder looks good, but it lacks few features if you compare it with competitors. Still, you will be able to find numerous features that modern website creators require.
Jimdo has 3 pricing models: With their free plan you get:
- Website storage up to 500 MB
- Bandwidth up to 2 GB
- Jimdo.com subdomain
- Jimdo advertisement
- Up to 5 products in online store
- No transaction fees
Jimdo Pros
This plan costs $7.50 per month (billed annually) and offers features like:
- Website storage up-to 5 GB
- 10 GB of bandwidth
- 1 Free custom domain
- Single email account along with 3 forwarding Aliases
- Up to 15 products for online store
Jimdo Business
For this plan, you will have to pay $20 every month. It offers features like:
- Unlimited site storage and bandwidth.
- 20 custom emails along with unlimited forwarding aliases.
- Premium support system with quick response in 2 regular business hours.
- Advanced SEO features.
Moreover, you’re allowed to add as many products as you want in your online store.
Advantages of Jimdo Builder Application
- WYSIWYG Website Building Platform
- Easy Social Media Integrations
- User-friendly website customizations
- Budget-friendly in comparison to the similar website builders
5. Voog

At this point, Voog is not that much popular. Still, this website builder is worth trying. The reason is their editor works well on mobile devices. Moreover, it supports multilingual sites. You need to follow a simple process to get your site translated into multiple languages.
Voog website builder was launched by Priit Haamer and his co-founders: Mart Kelder, Tonu Runnel and Toivo Annus. The company is headquartered in Tartu, Estonia.
Voog is not dedicatedly designed to develop mobile website still it supports an advanced editor which works extraordinarily on mobile devices, you may feel like that you’re using a dedicated mobile website application.
Speaking of themes/templates, you get access to a small range of but carefully-designed templates which are more likely to fulfill your requirements. All the templates are fully mobile responsive, having advanced features.
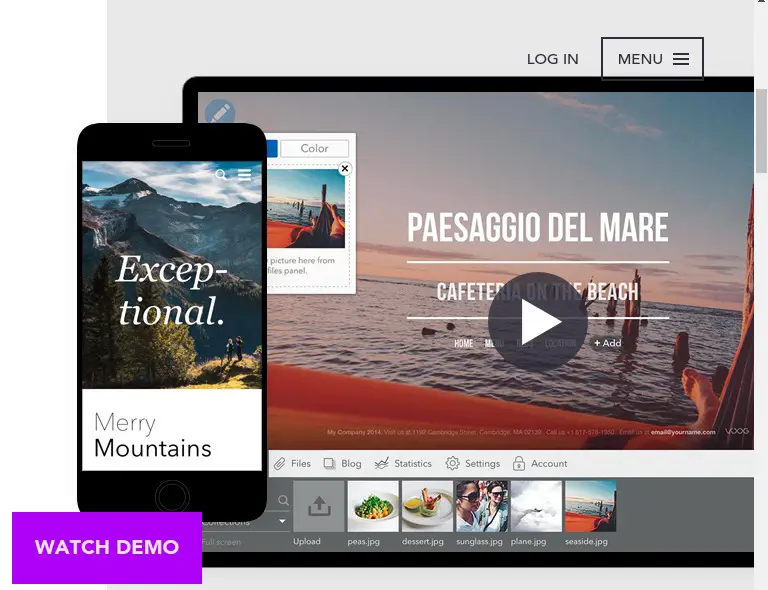
With almost every template, you get dummy text and empty space which you can edit according to your needs. The Voog editor has a horizontal toolbar at the bottom where you find a lot of tools to play with customization of your website. Since the editor is well-arranged, it will be easier for you to use different elements.
Voog also gives you an integrated blog which you can use to post announcements, updates and event details. This website building platform has three plans that you can choose from according to your budget and needs: Standard ($6.33/mo), Plus ($10.56/mo), Premium ($41.17/mo)
Benefits of Voog Website Builder
- The tool empowers users to create a quality website as it provides robust API and desktop tools.
- Since it supports multilingual, it will be easier for users to get their site translated into multiple languages.
- It offers great ease of use, even if you are a non-technical person, you will find how easy it is to create a website using this tool.
6. Webnode

Webnode is another well-known mobile website builder which is gradually becoming a household name. It has over 30 million registered users across the world. It was developed by Westcom company in 2008, which is situated in the Brno Czech Republic.
People looking for a feature-rich website building application for the Android operating system may rely on this mobile website builder. Webnode allows users to build an Android-compatible site in over twenty languages.
In addition to this, it provides users with a professional email address for their domain name. The interface is quite easy which will remind you of Microsoft office. Adding content on site is quite quick and easy. While forming a desktop version of your site, you can build a mobile version of your site automatically.
After launching your site, you will need to provide the information required to set up your own mobile site. Its comprehensive features are great for creating a fully functional site with a simplistic interface and quick setup capabilities.
For anyone who is planning to create a mobile site for the Android platform, this website builder offers a great starting point. Here are some benefits of using Webnode Builder App.
- An ideal platform for building multilingual websites.
- Clean & user-friendly interface.
- Advanced SEO Settings.
- Unlimited pages can be added.
7. Squarespace

Squarespace is the United States-based company that provides website building and hosting solutions. Their website builder lacks a mobile editor, but it has a lot of stylish and fully responsive themes that means your site will automatically react and adjust according to the screen size of a mobile device.
Additionally, the content is also optimized accordingly. You don’t need to do any complex coding to make your site’s content optimized for mobile devices.
All of the Squarespace themes look great even on the small screens. It will not be wrong to say, no other website builder can match up to themes when it comes to style designs.
Squarespace also supports AMP (Accelerated Mobile Pages), Google’s open source project for helping people to create mobile-friendly content. It makes web page loading exceptionally fast and improves the user experience.
Advantages of Squarespace Builder
- A wide range of responsive designs
- Basic Analytics & helpful tools
- Powerful web building tools
- Responsive design that fits any mobile screen
Final Words
The website builder market has been gradually heating up. Since the majority of website builders are coming up with mobile website building capabilities, more and more webmasters have started preferring them over traditional methods of mobile site building.
Weebly, Wix, Jimdo, Squarespace, etc are a few popular mobile website builders that are giving a tough competition to other mediums of website building. So, if in 2019, you’re planning to set up a mobile website, you may try any of the above-mentioned website builders.
