Wondershare is a renowned name when it comes to Mac & Windows software. The Filmora video editor is just another example of that. Previously, we reviewed its previous version – the Wondershare Filmora9. This time, we are looking at the latest update – the Filmora X.
The feature set of Filmora9 has been fully incorporated into the Filmora X with some cool and nifty new features. Wondershare has taken a lot of feedback and has overhauled the new software after several considerations. The result – a fully-fledged video editor that can easily replace the Windows Video Editor or iMovie on your Mac.
In this post, we will test the new features of Filmora X and whether it is worth upgrading or not.
Everything new in Filmora X
As we mentioned before, this review will focus on key features that are exclusive to Filmora X. To check out other features of the software, you can read our Filmora9 review.
- Motion Tracking: Motion Tracking lets you attach an element to the moving object. The auto motion tracking feature ensures that your elements move with the moving object smoothly.
- Keyframing: You can customize any animation by adding keyframes to change the position, rotations, scale, and opacity of a clip.
- Color Match: This option lets you match selected clips’ colors to another frame from another clip.
- Audio Ducking: During monologues or dialogues, you can choose to fade away background music to ensure clarity while listening quickly.
- Keyboard Shortcuts Editor: Lets you create shortcuts using new hotkey commands.
- Plain Text: Add plain text to any part of your video.
- Advanced Title Editing: Lets you change the position, rotations, and scale of a title in a while on the player.
- Dark Mode: The new dark mode lets you edit while being comfortable with your eyes.
- New Effects:30 new elements and 9 callout titles added.
Let us take a deep dive into some of the newest features and see how it makes Filmora X standout from the rest.
Using Wondershare Filmora
Initial Impressions and User Interface
The entry point of the software provides you with options to select aspect ratio like Widescreen (16:9), Instagram (1:1), Portrait (9:16), Standard (4:3), Cinema (21:9), or custom. Select any of these modes according to your needs. It also prompts you to select the resolution in HD, Full HD, 4K, DCI 4K, or custom. The software also lets you edit these settings later after editing your video. As soon as you open the software for the first time, Filmora greets you with user-friendly suggestions and tutorials. Importing and add media is super easy, and so is the rest of the interface. The interface can either be set black or light grey. All the options and tools you need are right in front of you. Wondershare has done a great job of including a lot of features without it feeling cluttery or clumsy.
Apart from the standard toolbar options like File, Menu, Edit, etc., the software has another big toolbar on the top left, which you will use the most throughout the editing process. These are – Media, Audio, Titles, Transition, Effects, and Elements. There is also a Split Screen option that we will get into later on.
Motion Tracking
Motion tracking is one of the newest additions to the Filmora X version. It lets you track the motion of moving objects and lets you add elements, titles, and other things so that they can also move along with it. Using motion tracking on a video is simple as well. All you need to do is add your clip to the timeline from the top-left media menu. Now press Alt + X or right-click on the clip and select motion tracking from that menu, or you can also select the motion tracking icon on top of the timeline. Ensure that the header is placed at the start of your clip since it will start the motion tracking process from right there.
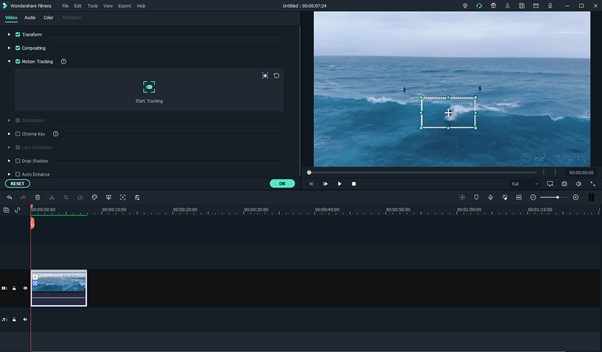
On the preview area, a dotted box will appear. Select the box and place it on top of the object you want to track. Then on the motion tracking menu on the top left section, select “Start Tracking”. Filmora will track the object automatically for you.
You can now add texts, titles, images, or other objects to follow the same movements. In this time, we will take the elements as an example. Go to the Elements tab, and then drag the element to the track above the footage. Since the element size isn’t perfect, so we adjust its size and position on the preview window accordingly.
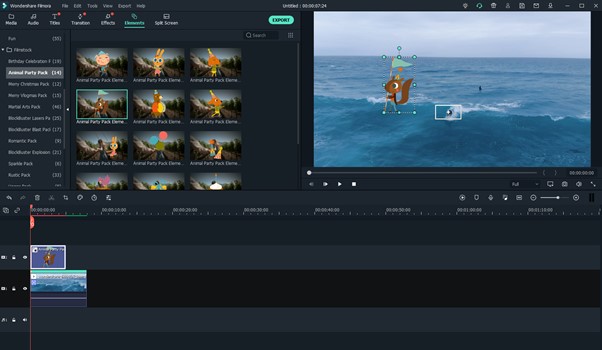
After all things are set up, double click the footage that applied motion tracking and go to the Motion Tracking option. From the drop-down menu, select the elements to move with the footage that tracked.
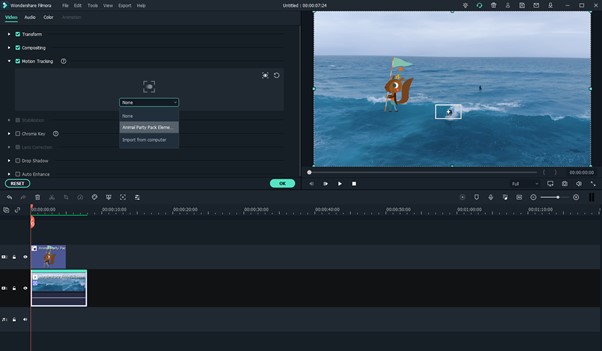
The element will move along with your subject very easily. We found that motion tracking on Filmora is accurate and does the job perfectly.
For a more details, you can check How to Do Motion Tracking in Wondershare Filmora.
Keyframing
Keyframing is one of the key concepts in animation that focuses on the beginning and ending point of the desired video clip. In between keyframes are numeric parameters of values that automatically adjust over the frame to another frame so that the initial and the next keyframe moves smoothly. This creates the illusion of animation.
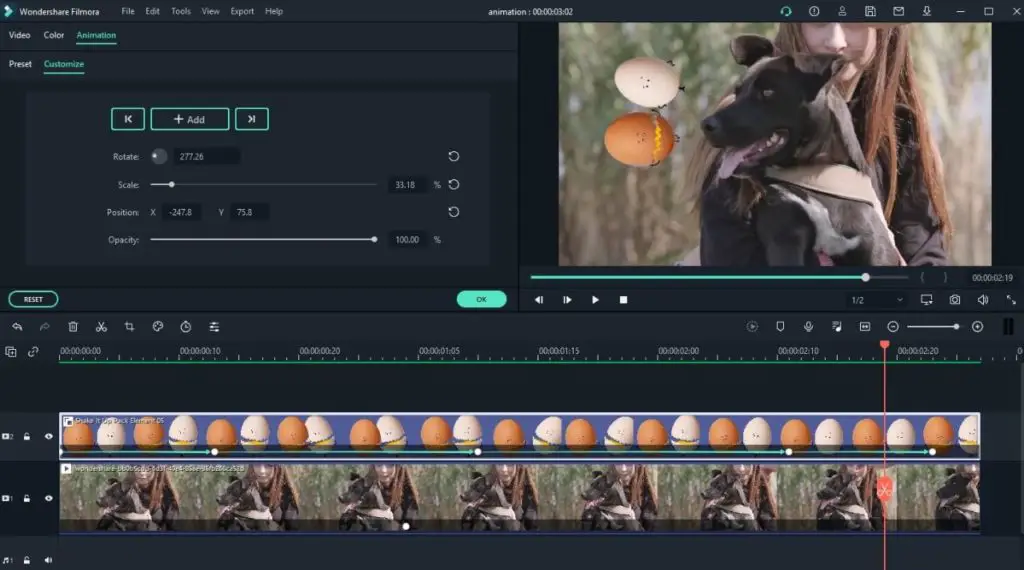
Filmora has some awesome built-in keyframing animation effects, such as fade, slide, zoom, vortex, and pause, which allows you to apply keyframing animation with just one click. Not only that, but the latest version also allows you to create customized animations. You can precisely control your animations with settings like rotation, scale, position, and opacity of a clip.
You can click this guide to check How to Add Animation Keyframing in Filmora X.
Color Matching
The Color Match feature lets you color correct multiple clips simultaneously instead of doing that individually with a new clip. To do this, you can drag the video and photo clips onto the timeline. If you want to do any custom color correction, you can choose any of the photos or clips you added and proceed with the changes.
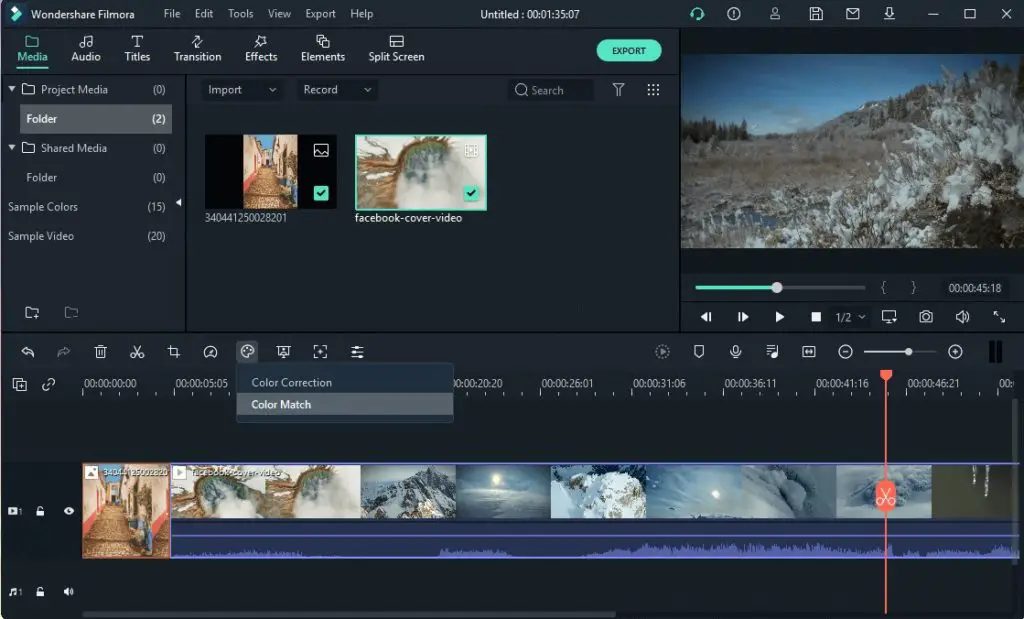
To color correct clips and photos together, move the play head to the frame you want to match the rest of your clips to. Now either right-click and select ‘Color Match’ or click the color icon on the toolbar and choose Color Match. Select one of the frames as a reference page and click on ‘Match’.
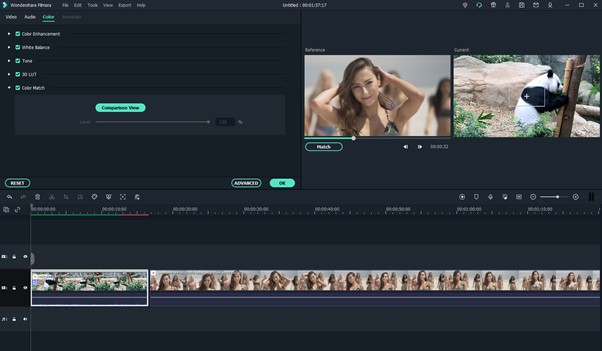
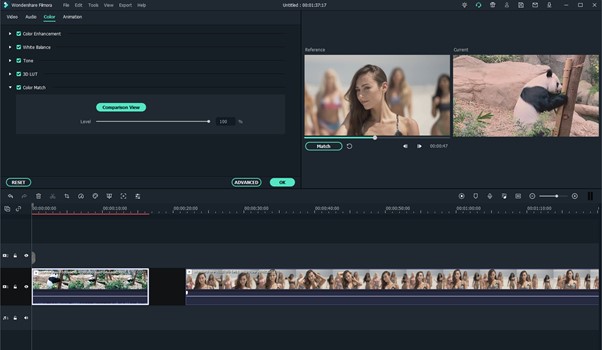
You can also adjust the degree to which the color settings are matched. You can see the difference in the preview in the ‘Comparison View’.
Audio Ducking
Audio Ducking automatically fades away the background from your video to make your dialogue stand out. The narrator’s voice can be heard consistently and clearly over the other sounds in your video. The main intention is to make sure the designated background track does not interfere with the actual audio track. When the narrator is not speaking, the background music will turn up, but once the narrator starts speaking again, the background music will fade.
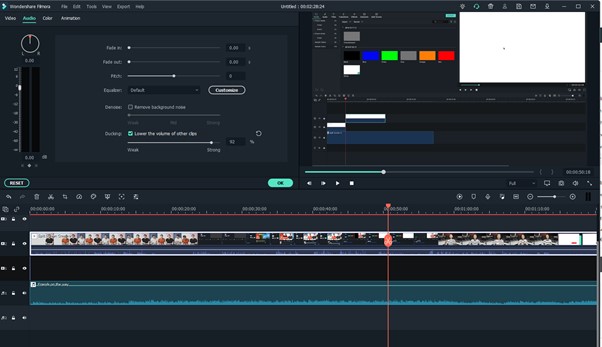
Right-click the clip in the timeline and then select the Adjust audio option. You will find the Ducking option at the bottom; check the option Lower the volume of other clips, and the corresponding music parts are lowered. You can also adjust the volume by moving the slider.
One of our favorite parts about the Filmora video editor is that it has some audio tracks pre-built. The Audio option lets you use the included audio files categorized according to various genres such as Rock, Folk, Electronic, Sound Effects, etc. To add your own audio files or to separate audio from your video, you can use the beforementioned Media panel. However, every song needs to be downloaded, which could be a small hiccup for those who want to experiment or mix with multiple sounds and audio.
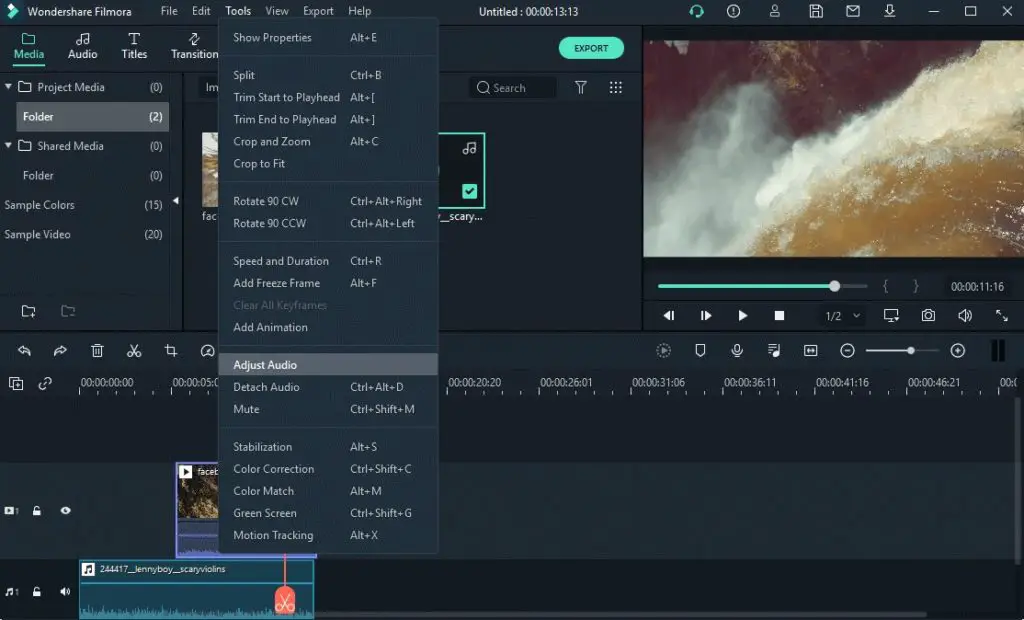
To add audio ducking to your video, start by importing the files you will be working on. Now insert the audio track, background music, and other things on the timeline. You can also choose royalty-free audio from the Music tab and drag it down to the timeline. Choose the clips you want to apply audio ducking, right-click, and select “adjust audio”. Check the box to decrease the volume of other clips.
Text and Titles
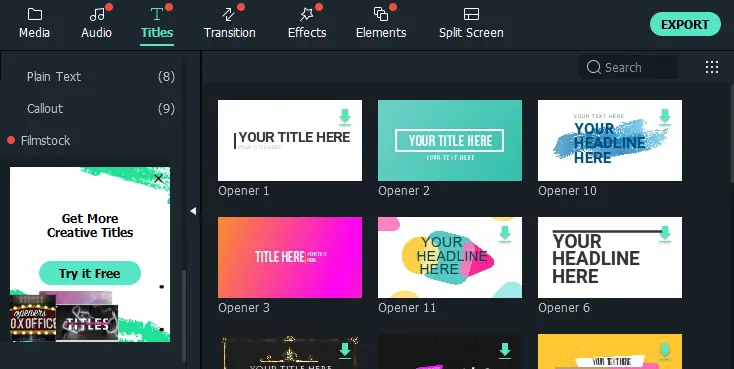
Filmora lets you create text and titles that incorporate your videos and style. You can add animated text effects, captions, subtitles, openers, end credits, and other kinds of text easily on Filmora. You can add different types of titles and text in the Titles menu. The latest X version of Filmora also allows you to add plain text, which adds more flexibility to your video style. However, everything needs to be downloaded, just like in the Audio section. You can get more creative titles from Filmstock as well.
Timeline
The timeline is super easy to look at, with various layers for audio, video, and other elements. Between the top panel and the timeline, there is a small strip that contains some key options. It includes undo, redo, delete, split, crop, speed, Advanced Color tools, Motion Tracking, Green Screen, and Edit for further customization. The strip also contains some other items like Render Preview, Add Marker, Record a Voice Over, Audio Mixer, Zoom to fit Timeline, and Zoom in and Zoom out options.

On the timeline itself, as we mentioned before, are various layers for audio and video. You can add more layers (up to 100) for complex projects that require multiple audio and video samples from different sources. Right-clicking on a video on the timeline opens up many options for you to select, as shown below. You can also mark different elements on your timeline with colors to select them together and apply a particular setting to only files of that color. Right-clicking on an audio track opens up a similar menu with color mark support.
Wondershare Filmora Pricing
Wondershare Filmora offers a free trial that lets you explore all the features and exports your video with a watermark. To purchase a license, you can either subscribe monthly or yearly or get it for a one-time price.
1. Annual – $39.99
- Free up to date with the latest features and version updates
- All features
- Free updates
- No Watermark
- Free Tech Support
2. Perpetual Plan – $69.99
This one prompts you to add a Filmstock subscription for $9.99 optionally. This plan does not include upgrades to future versions beyond Filmora X. It does include updates to Filmora X, which means that you can get the Filmora X version lifetime license, but for updates, you need to be subscribed. Other than that, you still get
- All features
- No Watermark
- Free Tech Support
System Requirements
Filmora is available for both Windows and Mac computers. Below is a simple system requirement table for you to quickly check if your Windows computer is compatible with Filmora X.
| Supported OS | Windows 7/Windows 8.1/Windows 10 (64-bit Only) |
| CPU | Intel i3 or better, 2GHz+. (Intel 6th Gen or newer recommended) |
| RAM | 4 GB RAM (8GB required for HD and 4K videos) |
| GPU | Intel HD Graphics 5000 or later; NVIDIA GeForce GTX 700 or later; AMD Radeon R5 or later. Please keep your graphics driver updated. |
| Disk | 10GB free hard-disk space (SSD recommended) |
Final Words
Wondershare Filmora offers an absolute bang for the buck for the feature it provides. The editor has no stones left unturned when it comes to feature set and tools. The user interface is super easy to understand, irrespective of whether you are a newbie or a professional coming from a different platform like iMovie.
However, there are some things like the Green screen and stabilization effect that can be further improved. But since Wondershare Filmora is constantly keeping the software updated and has an option to submit requests, we think they are improving it. Apart from that, Filmora is a great video editing tool for creators, and we definitely recommend it.
