If you have to multitask often, Windows 10/11 has an excellent feature for you. It’s called the Snap Layout. It allows you to split your Window screen into 2, 3, or 4 sections so that you can work with multiple apps simultaneously.
Snap Layout is a built-in feature, so you don’t need to download and install any third-party apps.
In this post, we will discuss the steps to split the Windows screen using Snap Layout and a few other ways.
Why should I split the Windows 10/11 screen?
To be more productive in your workplace, you might need two or more monitors to work with. But using multiple monitors at the same time is difficult and expensive.
A better alternative is the split-screen feature that allows you to split the Windows 10/11 screen into multiple sections. This way, you can view and work on different windows simultaneously.
Both Windows 10 and Windows 11 have split-screen options. Using this feature, you can split the screen into 2, 3, or 4 screens.
Also read: 22 Best CMD Commands for Windows
Ways To Split The Screen In Windows10/11
1. Split the screen with Snap Layouts
Snap Layouts is a built-in feature that allows you to split the screen into two or more parts. We will learn the steps to use this feature in the lines below.
Split The Screen Into Two Sections:
Using the Snap Layout option, you can split the screen into two halves in no time. This requires you to enable the Snap Layouts option from the Windows Setting Menu.
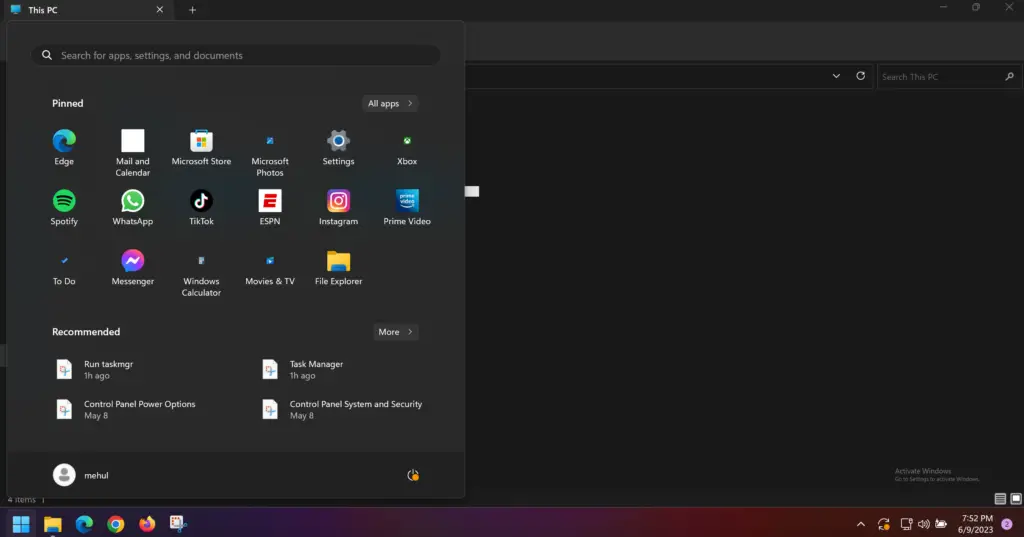
- Click on the Windows button and access the Settings Menu on your computer.
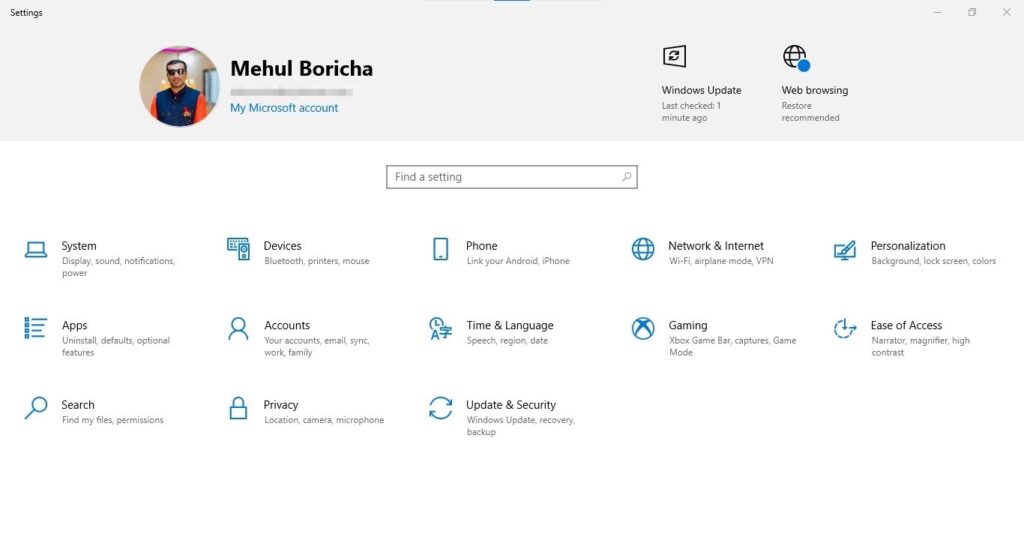
- Go to System and then to Multitasking.
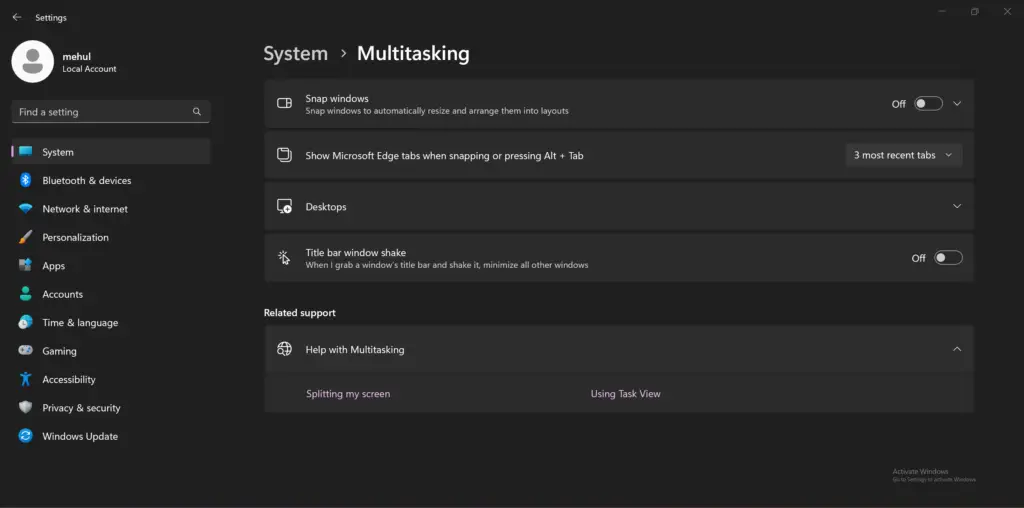
- Enable the Snap Windows section.
- Click on Snap windows to see more options.
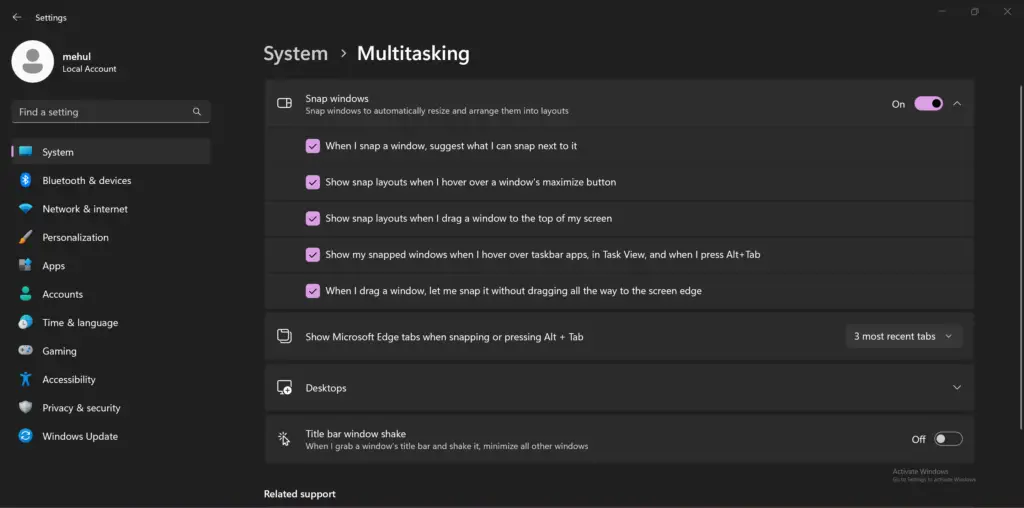
- You will see a list of options under this section. Checkmark the options you want. You can select all of them if you want to.
- Go to the folder you want to split and click it open.
- Hover the cursor on the Maximise button. It is located on the top right edge of your screen.
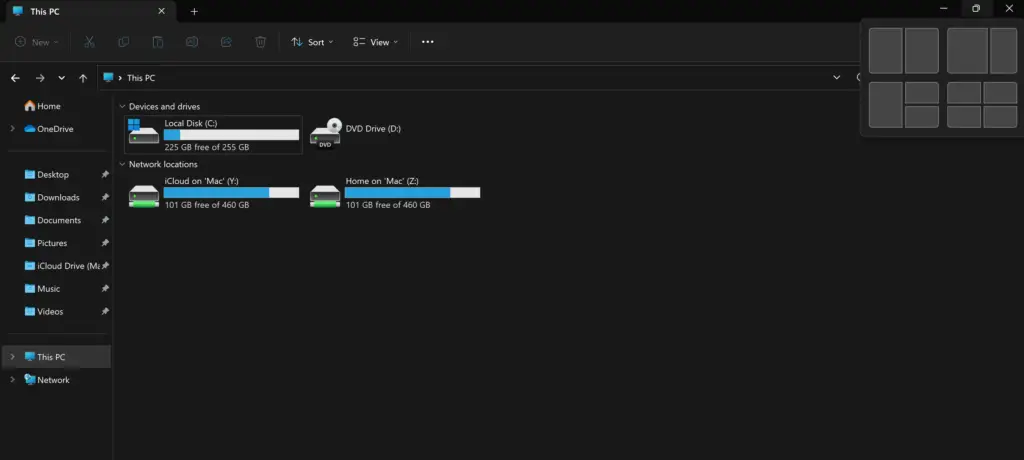
- You will see the different layout options.
- Select the layout with two sections. This will cause your current app window to snap into the selected layout while the other apps will be shown in the other half.
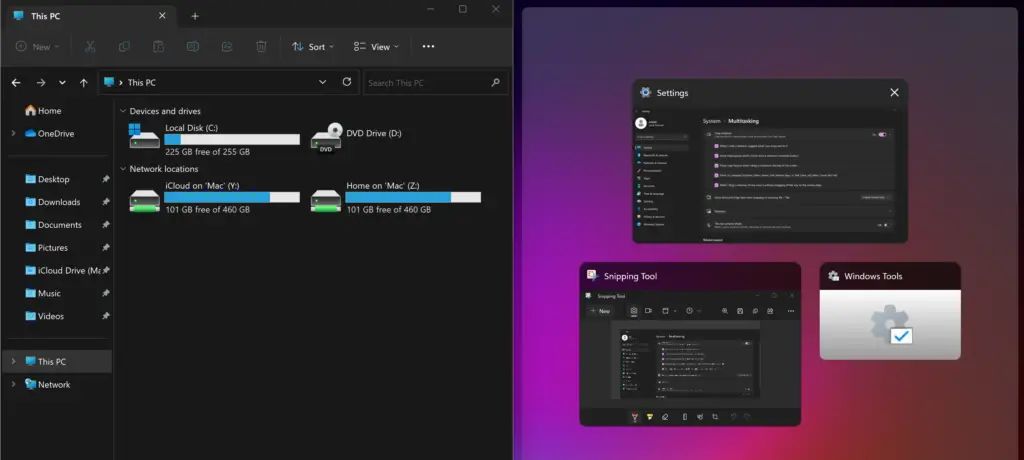
- Select the app that you want to add in the other half.
- Now you can see both the app windows on your screen simultaneously. You can access both sections simultaneously.
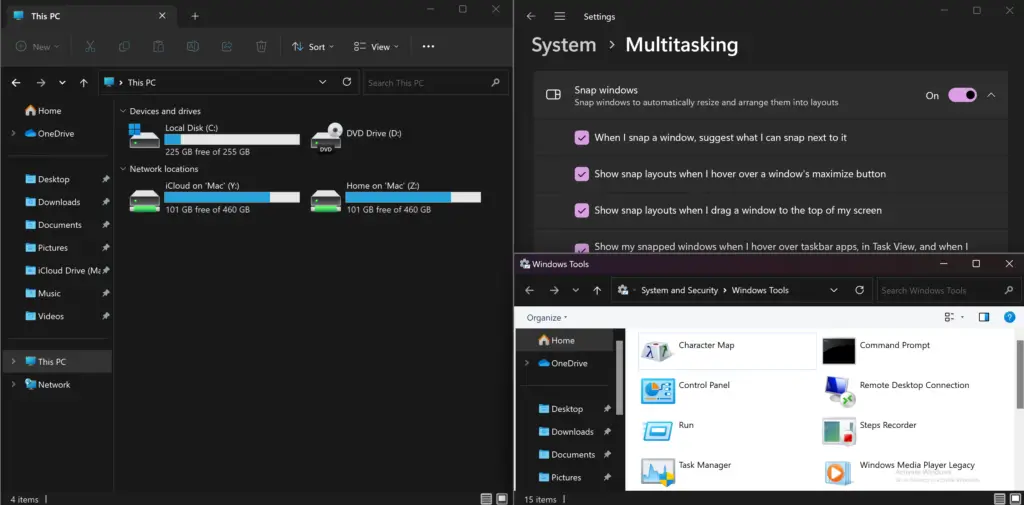
Split The Screen into Three Sections
Same as earlier, When the layout options appear, select the one with three sections.
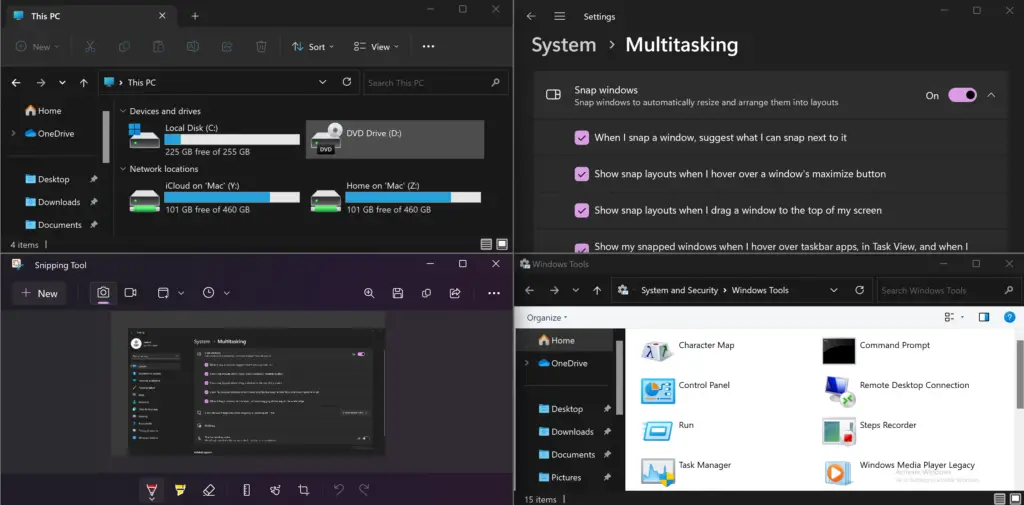
Split The Screen into Four Sections
Same as earlier, When the layout options appear, select the one with three sections.
2. Use the Mouse
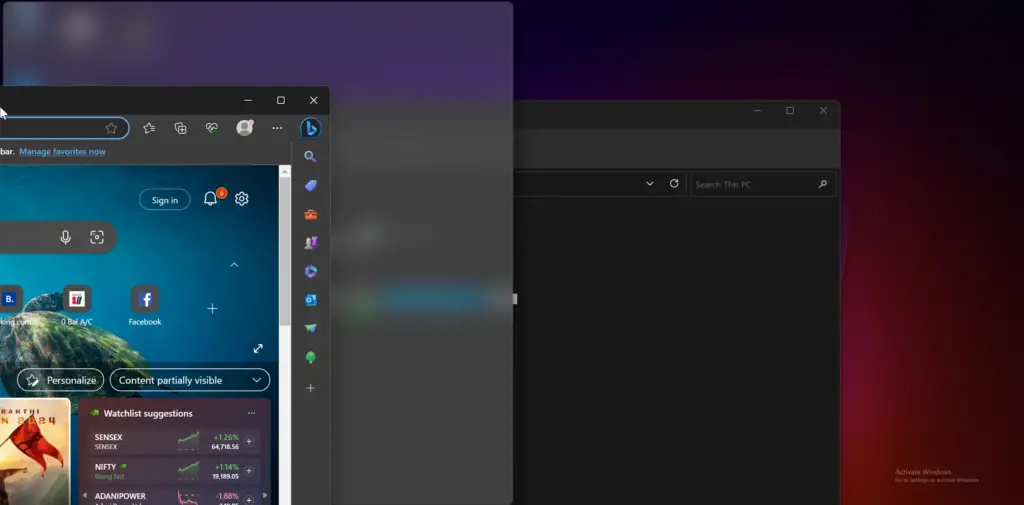
- Hold and drag the main window, either left or right, as far as the cursor goes.
- Let go of the cursor when you see a hazy outline. This is the section that the app will take up in the background.
- Now select the other app window.
- Once you see both windows on your screen, you can resize them by dragging the line between the two windows.
For splitting the screen into three or four parts:
- Hold and drag the main window to the corner and leave the cursor as soon as you see the hazy outline.
- You will see the main window and other apps on your screen.
- Select the desired two apps to add to other sections. This will split the screen into three sections. Follow the step above and resize the windows as per your liking.
- Repeat the same steps from the beginning to split the screen into four sections.
3. Split the screen with a Windows keyboard shortcut
- First, you need to open the Window that you want to split.
- To split the screen into two parts, press the Windows + Left or Right keys together.
- For three sections, follow the keyboard shortcut mentioned above, and stay on the least important window. Now use the same shortcut again.
- For splitting the screen into four sections, follow all the above steps. After that, select the most expanded window, and use the keyboard shortcut again.
- The main window will show on the screen, and the other app windows will appear on the opposite side.
- Select the app windows you want.
- This will split the screen into the number of selected sections.
Splitting your Windows screen into multiple sections can help you stay organized while multitasking. You can split the screen into four sections to work on simultaneously. You can use the Snap Layout option, keyboard shortcut, or mouse to split the screen.
Also read: 10 Best Windows 10/11 Themes & SkinPacks
Frequently Asked Questions (FAQs)
Why should I split my Windows screen?
Splitting your Windows screen allows you to work with more than one app/program at the same time. This feature is quite helpful for multi-taskers as it helps them to stay organized.
How to split the Windows screen?
You can split the Windows screen into 2, 3, or 4 sections using the Snap Layout function. Other methods include the mouse or keyboard shortcut.
The windows screen can be split into how many sections?
You can split your Windows screen into 2, 3, or 4 different sections.
How to enable the Snap Layout feature?
The Snap Layout feature can be activated from your Windows Settings Menu. The steps are mentioned in the above post.
How to go back to normal from the split screen on Windows 10/11?
When you are done using the split screen function, press the Escape (ESC) button on your keyboard. This will return the screen to its normal form.
Can I split my screen on Windows 10?
The split screen functionality is present in both Windows 10 and Windows 11.
How to split the Windows screen manually?
To split the Windows screen manually, you must use the keyboard shortcut Windows + Left or Right Keys. Press the two keys together.
What is the advantage of splitting the Windows screen?
The main advantage of the split-screen feature is that it allows you to multitask. You can split your screen into four sections.
How to split the Windows screen using a mouse?
Hold and drag the Window as far as the cursor goes, and select the apps you simultaneously want to work with.
Does splitting the Windows screen affect the performance of the computer?
No, splitting your Windows screen doesn’t affect the performance of your computer in any manner.
