Many of us have computers but don’t necessarily need or have a dedicated Ethernet or broadband connection for the same. Generally, we rely on our mobile’s internet for surfing the web on a PC. If you are unaware of, there are certain methods by which you can use your Android phone’s internet on your PC. This also includes Tethering- a common method to share internet over WiFi, Bluetooth, USB.
Also, you might feel this as a necessity in the cases when you don’t want to use the Public WiFi due to security reasons or are out with your laptop for work or even when you feel like your smartphone’s internet is faster than the default one.
For helping you out, here we are with some cool methods of sharing your Android’s internet with your computer(s). Most of these methods are easy to do and are available on all popular mobile platforms. So, without any further ado, let us begin:
Method 1: Sharing Internet over WiFi
Nearly all Android smartphones come with native WiFi and WiFi Hotspot functionality inbuilt and you can utilize the same for sharing your internet connection from Android to PC or any other WiFi-enabled device.

Follow the steps given below:
-
Unlock your Android smartphone, Navigate to Settings.
-
In the settings menu, look for Wireless & Networks Option. Open It.
-
Now click on the Hotspot & Tethering Option.
-
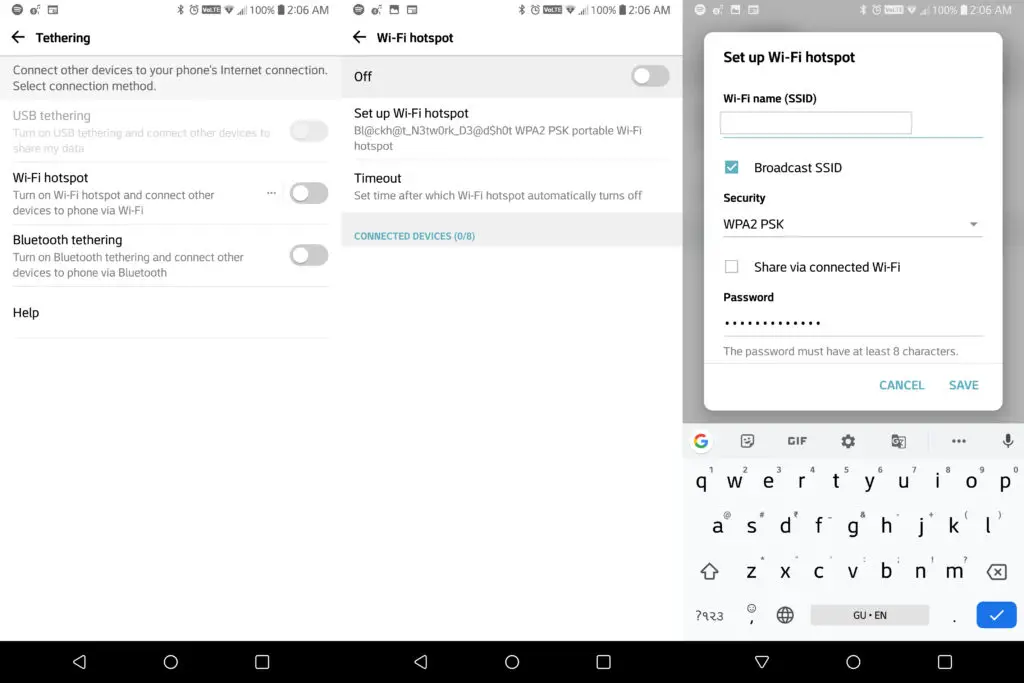
Tap on Wi-Fi hotspot, here you can customize your network’s name i.e SSID, password, and security level.
-
To turn on the WiFi, simply toggle the WiFi switch on the top right corner.
-
Now you will be able to enjoy the internet on other devices including PC, laptop, smartphones, etc, simply connect to the network you just created through WiFi. If in case your PC doesn’t support WiFi natively, you can buy a WiFi USB adapter which will cost around $5.
Some Tips: Turn off the Wifi hotspot when not needed to save battery drain. Also, use WPA2 PSK encryption and change the default password into a custom one for maximum security when regularly practicing this in public places.
Note: The settings layout might be different for devices running on different Android versions and skins. Also, this method will suck a lot of juice from your phone so better be ready with your charger in the first place.
Method 2: Sharing Internet using Bluetooth Tethering
The above method might not work for you if either of the host or the client device doesn’t support WiFi, this is the case where Bluetooth comes to rescue.

This method works for Android, Laptops, Computers and even some Nokia feature phones in the past supported this.
- Open settings of your Android smartphone.
- Go to the Network & Security option.
- Tap Hotspot and Tethering.
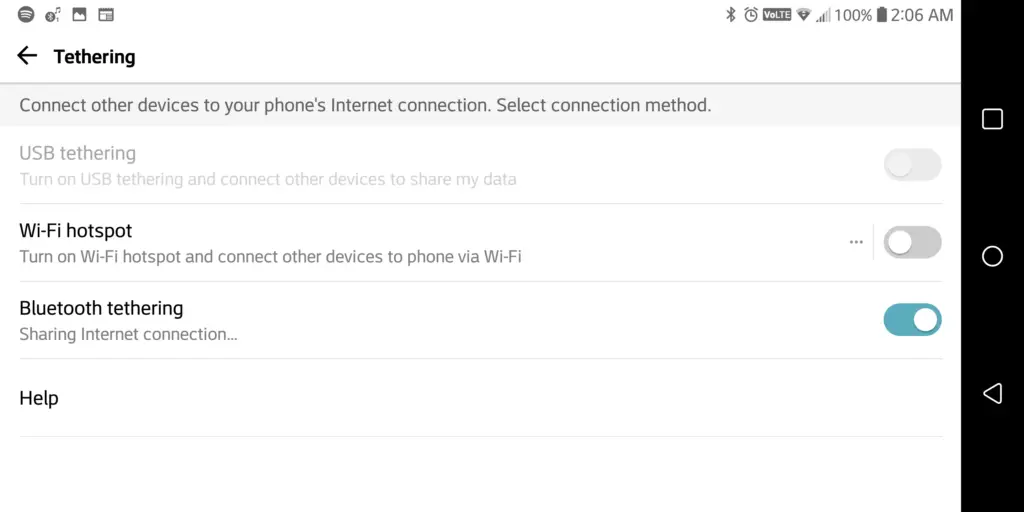
- Select Bluetooth tethering and toggle it.
- Now turn on the Bluetooth on the other device, connect to the network you just created, grant the permissions of internet access and you are good to go.
- On the computer, open Control Panel > Hardware and Sound > Devices and printers, right-click your phone’s icon and select connect Connect using the Access point. (in case the normal method doesn’t work)
Your phone will show a notification that Sharing Internet via Bluetooth. This method might not be the best for daily use due to its relatively lower speeds but yes, it does exist!
Method 3: Sharing the Internet using USB Tethering
Remember reverse tethering? when we discussed it in our “Use Computer’s Internet on Android” article? Well, it is the same but in a reverse way.
USB Tethering is basically sharing your Internet via the USB cable, in our case, it is from an Android phone to a Computer using the give Micro/type-C USB Cable. This method is used in most of the cases and doesn’t require WiFi or Bluetooth except for a cable.

To use this, follow the steps below with which you might be already familiar by now.
- Navigate to your Android phone’s settings as usual.
- Go to Networks & Security option.
- Next, Select Hotspot and Tethering option.
- Now, connect your Android phone to your PC using the provided USB cable that came in the box. Make sure that proper drivers are already present on your PC.
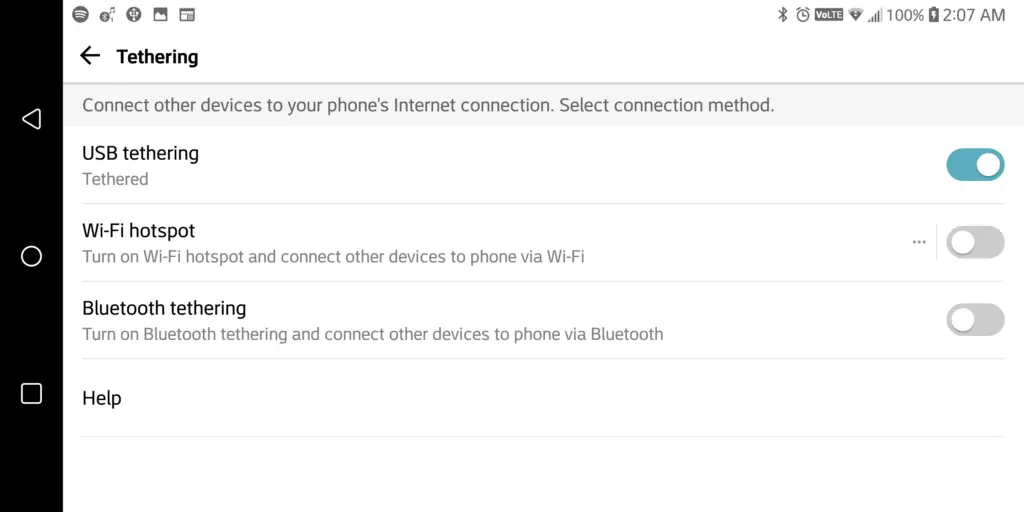
- Now, turn the USB tethering toggle On and select the network as Private when asked by a pop-up on your computer.
You will now be able to access data on your PC. This is the most reliable and preferred method due to the fact that it also charges your phone simultaneously meaning no battery drains like the ones in WiFi and Bluetooth tethering, Internet, it keeps the phone cool compared to when you use Hotspot in order to create a network.
Method 4: Use Open Garden to share Internet
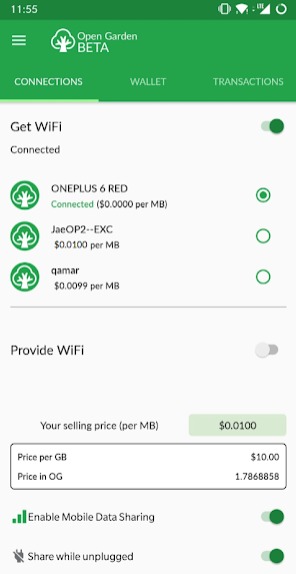
Open Garden is a simple yet powerful software that allows you to connect all your devices together (laptop, tablet and mobile phone) in order to share the same Internet connection. This means, for example, you can connect your laptop to the Internet using your Android phone’s connection.
It works on the basic tethering principles and uses WiFi and Bluetooth together for the same.
Open Garden enables anyone to share their Internet connection with people nearby in exchange for our cryptocurrency, OG Token (or OG) and thus you can even sell your internet connection or buy it from someone else in emergency situations.

Connecting is quite easy, just install the Open Garden App on Android phone and Windows/Mac PC. Allow for the Bluetooth, Location and VPN permissions and press the connect button on both the devices.
Follow the on-screen instructions and there you are. The app provides high-speed sharing between two or more devices, yes, you can connect even more if you want. You can also set data limits in order to save on data bandwidth, further, you can also monitor the data used by devices connected via Hotspot.
I used to use this App around a year ago before I got a broadband connection at my home. It has a pretty intuitive UI and is pretty easy to use.
Method 5: Share Internet using tethering and PDANet+
Requirements
- PDANet+ for Windows.
- PDANet+ for Android.
- Android Phone And Windows PC. (Obviously)
Steps to use Android Phone’s Internet on Computer using PDANet+
- Download PDANet+ for windows from above link.
- Install the software on your computer.
- Enable USB Debugging on your device.(Go to Settings -> Developers Option -> Tick USB Debugging Option) (In case you do not find Developer options on your device, then go to Settings -> About -> Tap on build number for about seven times. A popup will show that you are now a developer and developer options have now been enabled.)
- After installation, connect your phone to your PC if asked by the installer.
- Remove the USB cable.
- Enable data connection/internet on your phone.
- Open PDANet+ application on your phone.
- Check USB tether.
- Connect your phone to your computer.
- Open PDANet+ on your computer.
- Right-click in the notification area and click connect the internet.
- Good job! Now you are ready to surf your phone’s internet on your computer.
So here were the top five methods to share the Internet from your Android Phone to your Computer. You can use either of them as per your convenience and available options. However, we recommend doing an internet speed test to see which method is working best for you. Our most preferred method remains USB-tethering. Let us know which one do you use the most for sharing the internet connection with your PC.
Thank you for reading this post and keep connected to Tech Arrival to continue enjoying beautiful posts. Share your views on this post in the comment section below. If you still have any query, throw it in the comment section.
If you find this post helpful, don’t hesitate to share this post on your social network. It will only take a moment and also it is quite easy and useful for others.

